Tuesday, September 4, 2012

Fire Roasted Salsa


See Video Here:  https://www.youtube.com/watch?v=mJy6SSpBaFg&feature=plcp

Ingredients 
Use whatever chili's look good. This batch included
6-7 Poblanos
8-9 Jalapenos
8-10 Anaheims
6-8 Seranos
6-8 Habaneros
2 White Onions
1 Red Onion
1 Head Garlic
6-8 Roma Tomatoes
2 16oz cans crushed tomatoes
2-4 TBS Taco Seasoning
2-3 TBS Sea Salt

Pre-Heat BBQ to high. Prep all your vegetables by de-seeding all of your chilis (This makes for a milder salsa, but I don't like the bitter taste of seeds in my finished product and I don't like the look of the seeds floating around in there. If you don't want the extra work, by all means, leave them in). 
Cut onions, tomatoes and garlic in half. Place everything on the grill (cut-side up for the chilis, cut-side down for everything else). Roast until everything is well charged then remove from BBQ.

In a Vita-Mix (or other powerful blender) add a couple of ladles of the crushed tomatoes and in batches, puree the grilled vegetables. Pour into an 8qt stock pot, season with the sea salt and taco seasoning and then set over medium heat and reduce for 20-30 minutes. 

Can in purified glass jars according to manufacturers instructions. This salsa should keep at room temperature for 4-6 months.

Tuesday, August 28, 2012

Summer Salad of Roasted Red & Golden Beets, Peaches, Whipped Chevre, Pisatachios and Micro Greens


Salad Ingredients
1 Cup Micro Greens
1 Large Yellow Peach
1 Medium Red Beet
1 Medium Golden Beet
1 oz Shelled Pistachios
4 oz Chevre (Goat's Milk Cheese)
4 oz Heavy Cream

Vinagrette
2 Tbs Mango Vinegar (or favorite vinegar)
5 TBS Olive Oil
Pinch of Sea Salt

Blackberry Sauce
4 TBS Blackberry Jam
2 TBS Vinegar
2 TBS Water
1 TBS Cold Butter

For the Beets
Trim the stem and root ends of the beets, lay on a 24" square sheet of foil, drizzle with olive oil and sea salt, wrap tightly and roast in a 350 degree oven for 1 hour. Let cool, then peel and cut into wedges.

For the Chevre (Goat's Milk Cheese)
In a mixer combine the chevre and cream. Whip until light and airy.


For the Blackberry Sauce
Add all ingredients to a blender and blend until smooth. Stain through a fine mesh sieve and then place in sauce pan and reduce until syrup like in consistency. Whisk in cold butter and then let cool and place in a squeeze bottle.

For the Vinaigrette
Add salt and vinegar to a bowl. Whisk in olive oil in a slow drizzle to emulsify.

To Plate
Place a dollop of the chevre on a plate and then scrape with a spoon across plate. (see video). Add Peaches, beets, pistachios and then top with micro greens. Dress with the vinaigrette and then spoon the black berry sauce on the side.


Saturday, January 8, 2011

Potato Pave

Another great Keller Recipe. I've made this a few times and my kids love it (I think that it's pretty tasty too...) Russet Potatoes, Butter, Cream, Chives.... what could be better? This is a fantastic side dish that goes well with any kind of meat...

What you'll need:
1 cup heavy cream
Sea salt and freshly ground black pepper
3 lbs russet potatoes (try to find the largest potatoes that you can get your hands on)
5 tablespoons butter, 1 tablespoon softened and 4 tablespoons cut into 1/2 inch cubes
Canola oil
2 thyme sprigs
2 garlic cloves crushed, skin left on
Minced chives

Preheat oven to 350 degrees

Pour cream into large bowl and season with salt and pepper. Peel the potatoes. Using a mandoline, cut the potatoes length wise (about a 1/16" thick) and allow to fall into the bowl of cream. Toss the potatoes from time to time to make sure that they are well coated.

Brush a 10x6.5x3-inch pan with half of the softened butter. Line with parchment paper, leaving a 5-inch overhang on the two long sides. (You'll use these to lift the potatoes out of the pan). Brush with remaining softened butter and sprinkle with salt and pepper.
Trim the potatoes so that they'll fit in a single layer and lay them in the direction that works best to fill the pan. Repeat with the second layer and add a few of the cubed butter pieces and sprinkle with salt and pepper. Repeat adding butter and s&p every couple of layers until you have about 16-17 layers of potatoes.
Cover tightly with foil (so that the potatoes steam as they bake) and toss in the oven for about 1 hour 50 minutes until they are completely tender when pierced with the tip of a knife.

Let cool for 15 minutes. Wrap a piece of cardboard that (is cut the same size as your pan) with foil and place on top of the potatoes. Place a couple of heavy cans on top to weigh the potatoes down. Allow to cool to room temperature and then place in the refrigerator for at least 6 hours or up to 2 days.
To server, run a pallet knife around the edge of the pan. Using the parchment paper, lift the potatoes out of the plan and place upside down on a cutting board. Trip the sides and the slice into 12 equal pieces and let sit at room temperature for 30 minutes.
Heat some canola oil in a large frying pan over medium-high heat. Add the potatoes cut-side-down, add the thyme and garlic, and cook basting with the liquid in the pan until browned on the first side, then turn carefully and brown the opposite side. You can fit 3-4 of the pave in a pan. Remove the garlic when it begins to brown. Cook the remaining potatoes.

Arrange the potatoes on a serving platter, browned side up. Top with a small piece of butter and sprinkle with chives and sea salt and freshly ground black pepper and you are done. You'll end up wanting to make more because 2 of these servings is just not enough...

Sorry for the picture quality... I shot all these using my camera on my phone

Saturday, September 4, 2010

Buttermilk Fried Chicken


What??? A Thomas Keller fried chicken recipe? My kids have been begging me to make them friend chicken so when I saw this recipe in Ad Hoc at Home, I knew that I had to try it... Takes some prep time, but it's definitely worth the effort. The chicken comes out really crunchy on the outside (I mean audibly crunchy... I could hear my kids chomping away in the dinning room while I was in the kitchen frying up another batch), but very moist and juicy on the inside... This is a must try recipe for anyone who loves chicken. What makes this recipe great is the fact that the chicken is brined for 12 hours before breading and frying...

Ingredients
Two 2 1/2 - 3 lbs chicken (not the costco type like I used. Those are 4-5 lbs birds... the trick to a golden crust and a cooked-through piece of chicken is the smaller pieces... Search them out and you'll be much happier with the results.

Cold Chicken Brine (recipe below)

Dreding and Frying
Canola Oil (or peanut oil) for deep-frying
1 quart buttermilk
Kosher Salt and Fresh Ground Pepper

Coating
6 cups all-purpose flour
1/4 cup garlic powder
1/4 cup onion powder
1 Tbs plus 1 tsp paprika
1 Tbs plus 1 tsp cayenne
1 Tbs plus 1 tsp kosher salt
1 tsp freshly ground black pepper

Fine sea salt
Rosemary and thyme sprigs

The brine makes all the difference with this chicken. It's worth the extra day to make, chill and soak the birds...
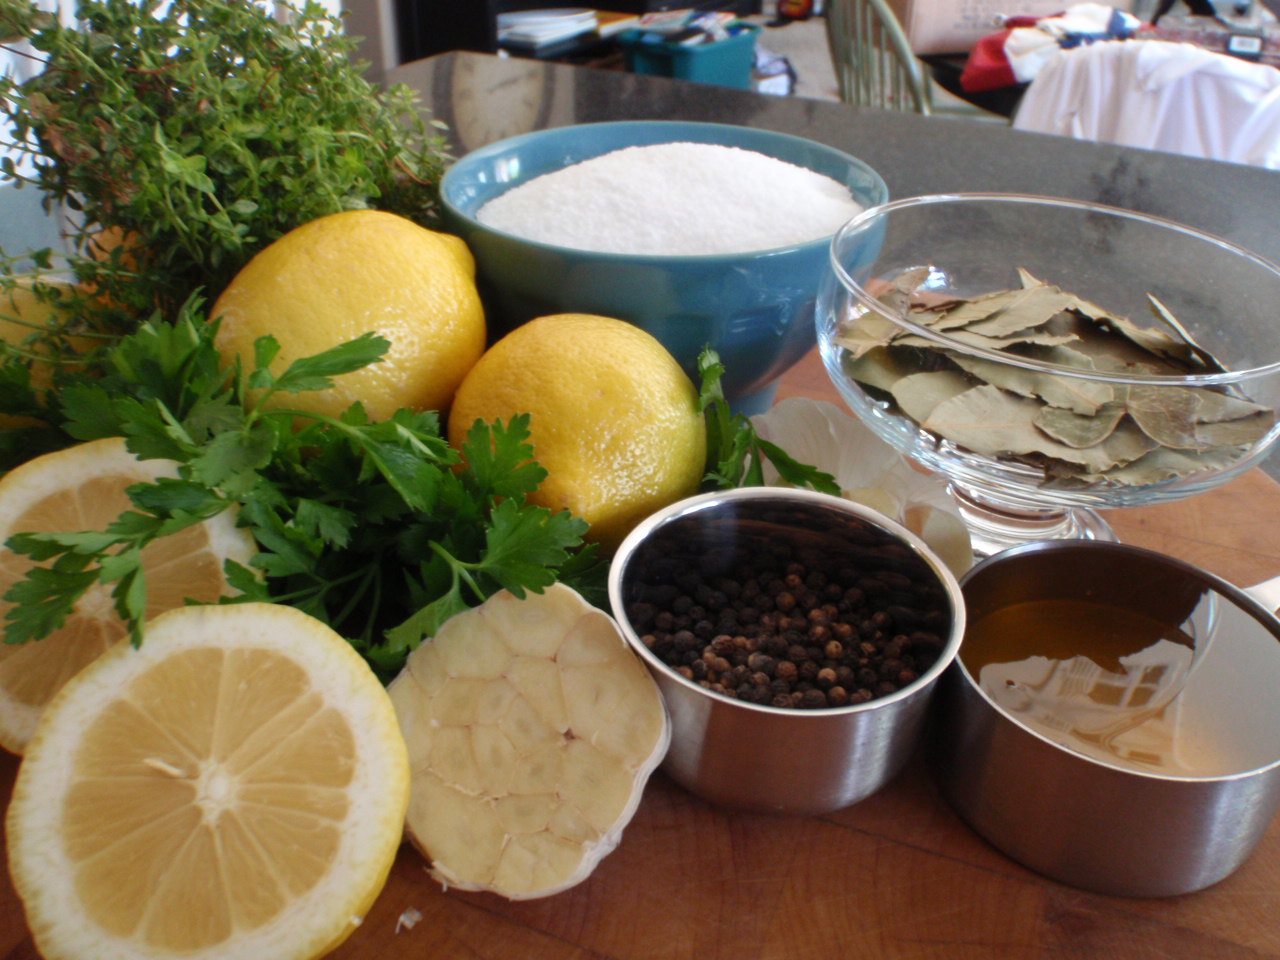
Brine Recipe
5 Lemons
24 Bay leaves
1 bunch (4 ounces) flat-leaf parsley
1 bunch (1 ounce) thyme
1/2 cup honey
1 head garlic, halved through the equator
1/4 cup black peppercorns
2 cups kosher salt
2 gallons of water.


Combine all ingredients in a large pot, cover and bring to a boil. Boil for 1 minute, stirring to dissolve the salt. (Your entire house will smell like Bay leaves). Remove from heat and cool completely, then chill before using.


Cut each chicken into 10 pieces: 4 breast quarters, 2 legs, 2 thighs, 2 wings. Pour the brine into a large container (enough to hold all the chicken pieces) add chicken and refrigerate for 12 hours. (It will become too salty if it goes longer than this).

Remove chicken from brine (discard brine) and rinse under cold water to remove all the herbs or spices that may be sticking to the skin. Pat dry with paper towel and let rest at room temperature for 1. 5 hours, or until it comes to room temperature. (Cold chicken will take too long to cook and will turn dark before it's cooked all the way through).

Next make the coating... (My wife's grandparents got this cool spice box on a trip to France that I love pulling out when the occasion calls for it. Thanks again Peg & Jim).

Combine all the ingredients in a large bowl. Transfer half of the coating into a second bowl for dredging. In a third bowl add the buttermilk.

Fill at least 2" of oil to a large deep pot (at least 6" tall), but no matter what size pan you use, the oil should not come up higher than 1/3 of the pan. Heat oil to 320 degrees. Set a cooking rack over a sheet pan for the chicken to drain & cool once it comes out of the oil.

With your dredging station in place (bowl of 1/2 coating, bowl of buttermilk, bowl of 1/2 coating) and the oil at the correct temperature, you are ready to dredge and fry the legs and thighs. Dip the chicken into the first bowl of coating, shake off excess, then into the buttermilk, then into the 3rd bowl for a final coating. Place on a sheet pan lined with parchment until you've breaded all the thighs and legs.

Carefully lower the chicken into the hot oil and fry for 2 minutes. Then carefully move the chicken around in the oil and continue frying for another 11 to 12 minutes, until the chicken is a deep golden brown. (I found that with my larger pieces that the chicken turned golden before the meat was cooked through. Once I had the color that I wanted, I moved the chicken to a 400 degree oven and allowed to finish cooking all the way through.

Transfer the cooked thighs and legs to the cooling rack skin-side up and let rest while you fry the remaining pieces. Sprinkle with fine sea salt once they come out of the oil. Make sure the oil is the correct temperature before you add the next batch of chicken.

Once the thighs and legs are done, heat the oil to 340 and then fry the breasts and wings. Cook the breasts for about 7 minutes and the wings for 6 minutes. Allow the chicken to cool for at least 10 minutes before you serve it. (Resist the urge to bite right into it... I didn't have the patience and almost burned my tongue off).

While the chicken is cooking, add some rosemary sprigs and thyme sprigs to the oil and fry for about a few seconds to crisp.


Arrange the chicken on a platter lined with brown paper, add the fried herbs and get ready for some good ol' American eating... We served this with mashed potatoes, gravy, glazed green beans, and corn bread.... Can't get more white trash than that, but it was awesome. My kids had fried chicken for lunch the next two days. They loved it!!!

Wednesday, March 31, 2010

Roasted New Potatoes with Rosemary and Garlic


Another favorite side dish... Roasted new potatoes with fresh rosemary and garlic. Our rosemary hedge is huge now on the side of our house and it's in full bloom. I had Maddyn go pick off 100 purple rosemary flowers for this dish. I love it when the rosemary blooms, as the flowers add some great color to what ever dish we're doing.

Ingredients
2-3 lbs small new potatoes (halved)
2-3 Springs Fresh Rosemary, chopped
3 cloves of garlic
1/2 cup olive oil
Sea salt
Black pepper corns
Rosemary flowers (if available)

Preheat oven to 400 degrees. Parboil the new potatoes in salted water until they are slightly underdone (they'll continue cooking in the oven). Drain potatoes and return to pot over low heat and gently stir (without crushing the potatoes) to dry.

With a mortar and pestle add about 2-3 teaspoons of sea salt and the garlic. Smash until a paste forms. Add peppercorns and grind to the consistency you like. Add chopped rosemary and bash to release their oil. Slowly drizzle olive oil while stirring to emulsify the marinade. This marinade is best if made an hour before so that the the flavors to develop.

Pour the marinade over the potatoes and toss to coat well. Put potatoes on a foil lined sheet pan and roast in the oven for about an hour, until the outside of the potatoes are nice and crispy...

All to cool slightly and sprinkle with rosemary flowers.

Sunday, March 21, 2010

Salad of Roasted Beets, Smoked Salmon and Fingerling Potatoes


This is a fantastic salad if you like smoked salmon, roasted beets and soft cooked eggs. If you don't like these things (like most of my family), then dinner is going to be a bit rough...

Ingredients
20 fingerling potatoes
2-4 medium beets
12 oz. smoked salmon
5 soft cooked eggs
2 tablespoons minced shallots
2 tablespoons chipped chives
mixed baby field greens
mustard vinaigrette
Olive Oil

Preheat oven to 375. Trim stems and root ends off of the beets. Place on a large sheet of aluminum foil, drizzle with olive oil, salt & pepper, wrap in the foil and roast until tender (about an hour). Meanwhile, cut the fingerling potatoes in half and simmer in salted water until tender when pierced with a fork. Drain and let cook on a tray.

When beets are done, remove from oven and let cool. When cool enough to handle peel and cut into wedges. Place in a bowl and allow too cool.

Soft-boil the eggs and cut into half and drizzle with olive oil and sea salt.

Make the mustard vinaigrette by placing 1 tablespoon dijon mustard in a bowl. Whisk in 3 tablespoons of champagne vinegar. Slowly drizzle in 1 cup of olive oil while whisking constantly to emulsify. Whisk in 1 tablespoon whole grain mustard.

Add minced shallots to a large bowl. Add potatoes and 2 tablespoons dressing. Sprinkle with sea salt and and ground black pepper. Drizzle beets with olive oil and salt and pepper.

Plate salad by arranging potatoes on large plates, add beets, baby greens, sliced smoked salmon and soft boiled eggs. Sprinkle with chopped chives, salt and pepper and drizzle with remaining dressing.

Love this salad!

Sunday, March 14, 2010

Ratatouille - Vegetable Gratin


One of my favorite Pixar movies (behind The Incredibles) is Ratatouille. You can really see Thomas Keller's influence in the amount of detail that the animators put into the inner workings of a professional kitchen. I've wanted to make a ratatouille since I saw the film and was glad to see a summer vegetable gratin recipe in Keller's new book "Ad Hoc". This is a great side dish and even though it's early spring, there was some great looking zucchini, yellow squash and egg plant at Henry's this week. So I thought I'd give this one a try. It's really easy to make and very tasty with some great grilled tri tip.

Ingredients
2-3 roma tomatoes
1 medium yellow squash
1 medium zucchini
1 japanese eggplant (or other small narrow eggplant)
canola oil
2 1/2 cups chopped onions
2 garlic cloves, finely grated with a microplane grater
kosher salt
1 tablespoon plus 1 tsp of chopped thyme
1/2 cup olive oil plus more for drizzling
freshly cracked black pepper
1/2 cup finely grated parmesan cheese
1/2 cup dried breadcrumbs


Preheat oven to 350 degrees. Slice vegetables with a mandoline as close in size as possible and toss with olive oil and a lite sprinkling of sea salt.

Heat some canola oil in a large frying pan over medium heat, reduce to low, add onions and garlic and season with salt. Cook without browning stirring occasionally, until the onions are translucent, about 20 minutes. Stir in 1 tbs of the thyme.

Combine parmesan and bread crumbs and remaining thyme in a small bowl.

Spread onion mixture in the bottom of a 13.5x9.5 gratin dish or 13 inch round shallow baking dish. Arrange a layer of overlapping slices of 1/3 of the squash around the outside edge of the dish. Sprinkle 2-3 tbs of the breadcrumb mixture over the top. Add a row of tomatoes, eggplant, yellow squash, zucchini until you the pan is filled adding a layer of breadcrumbs ontop of each layer. Sprinkle the top with any of the remaining breadcrumb/cheese mixture and a light sprinkling of salt.

Bake for 60-90 minutes until the vegetables are completely tender when pierced with a knife. Remove from the oven and allow to rest for 10 minutes. Server with a light drizzle of EV Olive Oil.

Serves 6-8